How to Spread Seed in Lawn for Thick, Healthy Grass
A thick, green lawn doesn’t happen by accident. It takes the right seed, the right timing, and a precise application method. If you simply toss seed on the ground and hope for rain, you are wasting both your money and your time.
Spreading grass seed correctly is a skill that separates struggling yards from neighborhood standout lawns. Whether you are overseeding a thinning lawn, repairing bare patches, or starting fresh on bare soil, the process follows a clear sequence: prep the ground, choose the right tool, apply seed in a deliberate pattern, and manage water meticulously until germination. For more on this, see our guide on how to seed tall fescue grass a complete.
Below is the complete, step-by-step system that will get you even coverage and strong germination without burning through expensive seed.
Why Proper Seed Spreading Matters
Grass seed is not cheap, and germination rates depend heavily on three factors: seed-to-soil contact, consistent moisture, and protection from birds and wind. If seed lands on top of hard, compacted dirt, it will dry out before the roots can establish. If it is buried too deep, it will never see the sunlight it needs to sprout. If it is applied unevenly, you will be left with patchy, embarrassing stripes. For more on this, see our guide on how to change oil on a lawn mower.
Getting the method right means you do the job once instead of three times.
Before You Begin: Timing and Grass Type
The single most common cause of failed seeding is planting at the wrong time of year. Grass seed does not germinate based on the calendar—it responds to soil temperature.
Cool-season grasses like tall fescue and Kentucky bluegrass grow best when soil temperatures sit between 50°F and 65°F. That window typically falls in early fall, when the air is cool but the soil retains summer warmth. Early spring also works, though fall is slightly better because weed competition is lower. For more on this, see our guide on how long for lawn to grow from seed.
Warm-season grasses like Bermuda grass and zoysia need soil temperatures above 70°F. Plant them in late spring or early summer, once the danger of frost has passed.
| Grass Type | Best Seeding Window | Typical Germination Time |
|---|---|---|
| Kentucky Bluegrass | Early Fall or Early Spring | 14 to 30 days |
| Tall Fescue | Early Fall or Early Spring | 7 to 14 days |
| Bermuda Grass | Late Spring to Early Summer | 10 to 21 days |
| Perennial Ryegrass | Early Fall or Early Spring | 5 to 10 days |
Before you commit to a seed type, take a close look at your local climate and sun exposure. For example, tall fescue handles shade better than most cool-season options, but it still needs at least four hours of direct sunlight to thrive. If you are in a warm region and considering Bermuda, you should also understand the dormant phase it goes through in winter before deciding whether it fits your expectations all year round. For more on this, see our guide on does tall fescue grow in shade a complete.
Soil Testing: The Step Most People Skip
A soil test is a cheap, fast way to avoid wasted effort. Grass needs a soil pH between 6.0 and 7.0 to absorb nutrients properly. If your soil is too acidic or too alkaline, the seed may sprout, but the grass will struggle to green up and thicken.
Most state university extension offices sell soil test kits for a small fee. The results will tell you your pH, nutrient levels, and exactly what amendments—like lime or sulfur—you need to add before seeding. This is an easy step that takes ten minutes but saves you months of frustration. For more on this, see our guide on how much is a pallet of bermuda grass.
What You Will Need
Gathering all your tools before you start prevents mid-project interruptions that can dry out your soil and ruin your timeline.
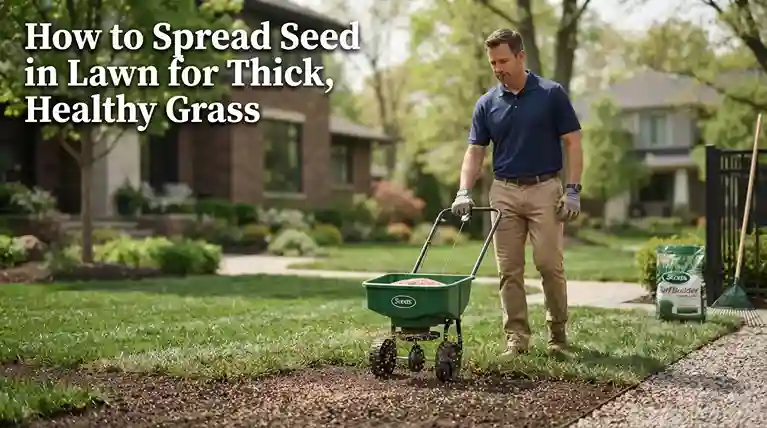
- Broadcast or drop spreader – Evenly distributes seed without clumping or gaps.
- High-quality grass seed – Matched to your climate and sun exposure; never cheap out here.
- Starter fertilizer – High in phosphorus (the middle number in NPK) for rapid root development.
- Metal bow rake – Loosens the top layer of soil and works seed into the dirt.
- Peat moss or fine compost – Retains moisture and hides seed from birds.
- Hose-end sprayer with a fine mist setting or oscillating sprinkler – Gentle watering is non-negotiable.
- Lawn roller (optional) – Presses seed into the soil for better contact.
A common mistake is picking the cheapest seed bag on the shelf. Lower-quality seed often contains a high percentage of weed seeds, inert filler, and poor germination rates. Look for a bag that lists the exact species and variety, and check the label for a germination rate above 85%.
Choosing the Right Spreader
The spreader you use directly impacts how even your coverage will be. There are three main styles, each suited to different yard sizes and layouts.
| Spreader Type | Best For | Key Advantage |
|---|---|---|
| Handheld Spreader | Small patches under 1,000 sq ft | Cheap, easy to store, highly maneuverable |
| Drop Spreader | Precise areas under 5,000 sq ft | Drops seed straight down, no overspray into beds |
| Broadcast Spreader | Large open lawns over 5,000 sq ft | Wide throw pattern covers ground fast |
For most homeowners with a yard larger than a postage stamp, a broadcast spreader is the right choice. It covers ground quickly and evenly. However, if your lawn borders flower beds, a pool, or other hardscaping, a drop spreader prevents seed from landing where it does not belong.
If your lawn is large enough to consider mechanical help, it is worth understanding the equipment options available. A zero-turn mower can dramatically reduce the time you spend on yard prep, especially if you are managing several thousand square feet of turf.
Step-by-Step Seeding Process
Follow these steps in order. Skipping any of them reduces your germination rate and risks a patchy result.
Step 1: Mow Low and Dethatch
Mow your existing lawn down to about 1.5 inches—shorter than you would normally keep it. This prevents mature grass from shading out the new seedlings. Then, use a dethatching rake or a power scarifier to pull up the layer of dead organic matter sitting on the soil surface. Your seed must make direct physical contact with dirt, not sit on a mat of dead grass.
If your lawn has a heavy thatch layer, a dethatcher is the right tool. Thatch thicker than half an inch will block water, nutrients, and seed from reaching the soil.
Step 2: Loosen the Soil
For bare spots, rough up the top quarter-inch of dirt with a metal bow rake. For larger areas, consider renting a core aerator. Aeration pulls plugs of soil out of the ground, relieving compaction and creating perfect little pockets where seed can settle and root.
Aerating is especially important if your soil is clay-heavy or sees heavy foot traffic. Compacted soil is the enemy of new roots, which need oxygen and room to spread. If you are dealing with a thick Bermuda lawn, understanding when to aerate is a critical part of the equation.
Step 3: Calibrate Your Spreader
Check the back of your seed bag for the recommended spreader setting. Different spreader models have different calibrations, so follow the bag instructions when available.
If your specific model is not listed, set the dial to a quarter of the maximum opening and test on a patch of driveway. You want the seed to fall like a light dusting of snow, not a heavy downpour. It is always better to put down slightly too little and make a second pass than to dump everything in one spot.
Step 4: Establish a Perimeter
Walk the outer edges of your lawn first, making one or two passes around the entire perimeter. This creates a “header strip” that gives you a designated turnaround area. This simple trick ensures you do not have to stop and start your spreader awkwardly at the edges, which is where most missed strips and accidental clumps happen.
Step 5: Walk the Grid Pattern
Divide your total seed into two equal halves. Put the first half in the hopper and walk back and forth across your lawn in straight, parallel lines. Once the first half is gone, load the remaining seed and walk perpendicular to your original lines.
This crisscross or checkerboard pattern guarantees even coverage. It is the single most effective way to avoid the bare stripes that happen when your spreader slightly misses an edge. Skipping this step and doing one pass in a single direction is why many DIY seeding jobs end up with noticeable lines.
Step 6: Apply Starter Fertilizer
Do not use standard lawn fertilizer. You need a starter mix high in phosphorus to promote immediate root growth. Apply it the same day you spread the seed, using the same grid pattern. The phosphorus stays where the roots need it, giving your new grass a strong head start.
Avoid pre-emergent weed killers at this stage—they block all seeds from sprouting, including grass. If you have applied any herbicide recently, wait at least four to six weeks before seeding.
Step 7: Topdress the Seed
Spread a very thin layer—about a quarter inch—of peat moss or fine compost over the seeded areas. This locks in moisture and hides the seed from birds. Do not bury the seed deeply; it still needs ambient sunlight to trigger germination.
Peat moss is particularly useful because it changes color as it dries, turning from dark brown to light tan. This acts as a visual reminder of when it is time to water.
Step 8: Roll the Lawn (Optional but Recommended)
Fill a lawn roller a quarter of the way with water and gently press it over the seeded area. This compresses the seed and topdressing into the soil, creating the firm seed-to-soil contact that germination requires.
Common Mistakes and How to Avoid Them
Even experienced gardeners make errors during the seeding process. Here are the most frequent ones and how to fix them.
| Common Mistake | Why It Harms the Lawn | How to Fix It |
|---|---|---|
| Applying weed killer first | Pre-emergents stop all seeds from sprouting | Wait 4–6 weeks after herbicide use before seeding |
| Burying the seed | Grass seed needs light to trigger germination | Never cover seed with more than ¼ inch of soil |
| Skipping the rake | Seed on hard dirt washes away or gets eaten | Always loosen the top layer before spreading |
| Overseeding | Overcrowded seedlings compete and weaken | Follow the bag’s coverage rates exactly |
Many homeowners assume more seed equals a thicker lawn. In reality, overcrowded seedlings fight for water and nutrients, producing weak, spindly grass that is more vulnerable to fungal disease.
If you accidentally dump a pile of seed in one spot, use a leaf blower on the lowest setting or a stiff broom to scatter the excess immediately rather than leaving it to clump.
Watering After Seeding: The Critical Window
Watering is where most people fail. Once grass seed gets wet and begins germination, it will die if it dries out for even a few hours. Your watering habits must shift from deep, infrequent to shallow, frequent.
| Seed Stage | Watering Frequency | Watering Duration |
|---|---|---|
| Days 1–14 (Germination) | 2–3 times per day | 5–10 minutes per zone |
| Days 15–28 (Sprouting) | 1 time per day | 15–20 minutes per zone |
| After First Mow | 2–3 times per week | 30–45 minutes per zone |
The goal during the first two weeks is to keep the top inch of soil consistently moist, like a wrung-out sponge. You do not want standing water—it causes seed rot and makes the seed float away.
Never use a high-pressure hose nozzle or a heavy sprinkler setting on freshly seeded areas. The force of the water will blast seed out of position and ruin your even distribution. Use a fine mist setting, and if possible, water in the early morning and late afternoon to reduce evaporation.
Timing and Cost Expectations
Seeding a 5,000-square-foot lawn is an achievable weekend project, but it requires consistent daily attention for nearly a month afterward.
| Task | Estimated Time | Estimated Cost |
|---|---|---|
| Prep (mowing, dethatching, raking) | 2–4 hours | Free if you own tools |
| Materials (seed, fertilizer, peat moss) | 1 hour shopping | $75–$150 |
| Application (spreading, raking, rolling) | 2–3 hours | Free |
The real investment is your time. The physical spreading takes one afternoon, but the daily watering commitment lasts for close to a month. If you are not prepared to keep that schedule, consider whether you can set up an automatic sprinkler timer before you begin.
Pro Tips for Maximum Germination
Small details separate a good lawn from a great one.
- Watch soil temperature, not air temperature. Buy a cheap soil thermometer. Cool-season grasses need soil around 50–65°F; warm-season grasses need soil above 70°F.
- Keep all traffic off the area. Kids and pets will crush tender new shoots. Tape off the seeded zone if necessary.
- Sharpen your mower blade before the first cut. Mow new grass when it reaches 3–4 inches tall. A dull blade will rip young plants out of the soil by the roots.
- Use peat moss as a moisture indicator. When it turns light tan, it is time to water. When it is dark brown, you can wait.
- Do not panic about birds. They will eat some seed. A light peat moss covering deters most of them, so resist the urge to overseed in response.
A sharp blade matters beyond this new seeding project. Learning how early you can safely mow your existing lawn is part of keeping your turf healthy through the season.
When to Call a Professional
DIY seeding is achievable for most flat, residential yards, but there are situations where hiring a contractor is the smarter move.
- Severe slopes: On any grade steeper than roughly 15%, traditional seeding is risky. Rain will wash seed downhill before it roots. Hydroseeding—a slurry of seed, mulch, and a glue-like tackifier sprayed onto the soil—holds seed in place on steep grades much more effectively.
- Major drainage failures: If your yard requires regrading or heavy equipment to move soil, let a professional handle both the dirt work and the subsequent seeding.
- Large-scale renovation: If you are seeding more than 10,000 square feet, the cost of renting commercial equipment and the time commitment may favor hiring an experienced crew.
Frequently Asked Questions
Q: Can I just throw grass seed on the lawn without raking?
A: You can, but your germination rate will be terrible. Without direct soil contact, the seed dries out, blows away, or gets eaten by birds. Raking the soil open before dropping seed is the non-negotiable step that determines success.
Q: When is the absolute best time to spread seed?
A: For cool-season grasses like fescue and bluegrass, early fall is best because the soil is still warm, the air is cool, and weed competition is low. For warm-season grasses like Bermuda and zoysia, late spring through early summer is ideal.
Q: Do I need to put topsoil over new grass seed?
A: You do not need a thick layer. A quarter-inch of peat moss, fine compost, or topdressing helps retain moisture and protect the seed. Never bury seed deeper than a quarter-inch.
Q: Can I walk on the lawn after seeding?
A: Avoid walking on it as much as possible. Foot traffic compacts the soil and crushes fragile sprouting roots. If you must step on it, use a lightweight board to distribute your weight.
Q: How long does it take for grass seed to grow?
A: Initial sprouting appears in 7 to 21 days depending on grass type and soil temperature. Full maturity—where the grass can handle regular traffic—takes eight to twelve weeks.
Q: What if my seed washes away after a heavy rain?
A: Identify the low spots and reseed them as soon as the soil is workable. This is why monitoring the weather forecast before you seed, and ideally before you spread any topdressing, is worth the effort.
Final Thoughts
Spreading grass seed correctly is a foundational lawn-care skill that rewards patience and consistency. Prepare the soil properly, choose high-quality seed, walk your yard in a disciplined grid pattern, and commit to the daily watering schedule for the first month.
Do not get discouraged if the yard looks muddy and rough for a few weeks. As long as you keep that top inch of soil consistently moist, those bare patches will fill in with thick, vibrant turf. The end result—a dense lawn that crowds out weeds and stays green through the season—makes the effort entirely worth it.
For your next project, use the same attention to detail when you sharpen your mower blade for the first spring cut. Consistent maintenance is what turns a newly seeded lawn into a permanent, resilient landscape.