How to Change a Spark Plug in Lawn Mower: My No-Stress Fix
Your mower sat in the shed all winter, and now it refuses to fire. If you’re here to learn how to change a spark plug in lawn mower engines, you’re chasing the right suspect. A fouled or worn plug is the most common cause of no-starts on small four-cycle engines, and it’s the cheapest fix on the whole machine.
The entire job takes 10 to 15 minutes and one specialty socket. Per manufacturer specifications, most mower engines call for a 0.030-inch electrode gap and a quarter turn past hand-tight. We’ll start with why this five-dollar part can stall an engine that otherwise runs fine.
How to Change a Spark Plug in Lawn Mower
How to change a spark plug in lawn mower engines takes 15 minutes flat. Start with a cold engine and pull the boot off. Remove the old plug with a 13/16-inch socket.
Gap the new plug to 0.030 inches before installing. Thread it in by hand, then tighten a quarter turn.
Why a $5 Spark Plug Fixes a Mower That Won’t Start (And Why It’s the First Thing to Check)
A spark plug has one job. It throws a spark across a tiny gap at the tip, and that spark ignites the fuel and air mixture inside the cylinder. A mower engine asks for that spark hundreds of times per minute.
Run it all summer and the center electrode slowly wears away. As the electrode erodes, the gap widens, and the ignition coil has to push harder to jump it. Eventually the spark gets too weak to light the mixture, and the engine stalls or refuses to start.
That failure follows a predictable pattern. First you notice extra pulls on the rope. Then the engine starts and dies, or surges under load.
Finally it won’t fire at all, even with a fresh tank. If your mower cranks but won’t catch after winter storage, a dead plug and stale gas are the two most likely culprits, and they often show up together. Half of these spring surprises disappear with a solid fall storage routine.
So why does this part go first on the checklist? Follow the math. A new plug costs 3 to 12 dollars and takes about 15 minutes to swap.
A carburetor cleaning or an ignition coil diagnosis costs multiples of that. Manufacturer maintenance schedules agree on the timing too: replace the plug every 25 to 50 operating hours, or once per mowing season. Nearly every spring tune-up starts here for a reason.
One honest caveat before we go further. The plug is the first thing to check, not always the last word. If the old plug comes out dry with a light tan coating, spark and fuel were both getting through, and the real problem lives elsewhere.
We’ll cover how to read those deposits a few sections down. First you need to find the thing, because on some engines it plays hide and seek.
What a Lawn Mower Spark Plug Looks Like and Where Yours Is Hiding
If you’ve never seen a plug up close, one photo makes this click faster than any description. A lawn mower spark plug is a small white ceramic cylinder with a threaded metal base and a bent metal hook at the bottom.
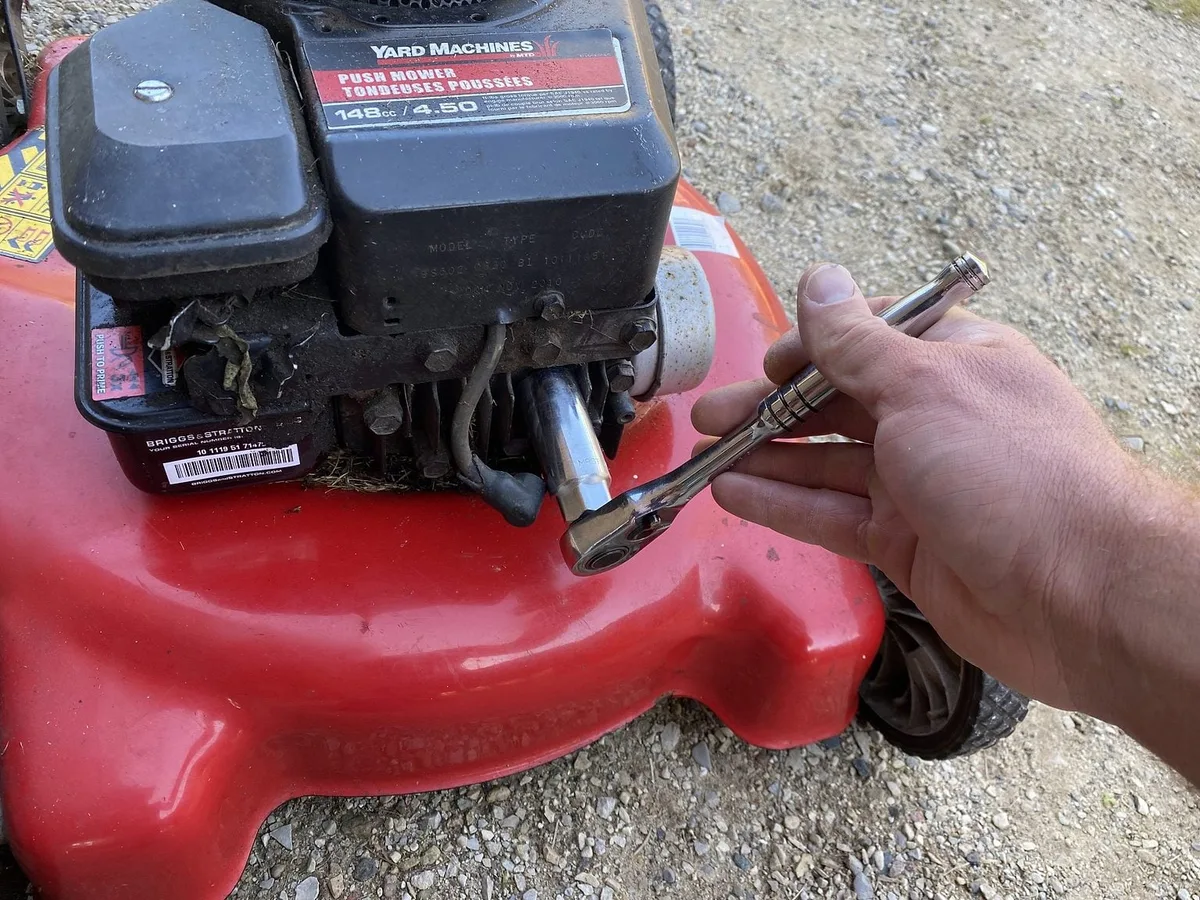
Image source: familyhandyman.com
Under the Boot: Plug Anatomy and the Electrode
Five parts matter for this job. The ribbed white ceramic insulator on top keeps high voltage from grounding out against the engine block. Below it sits the hex nut, the flat metal shoulders your socket grips.
The threaded steel body screws into the cylinder head. At the bottom, the center electrode hangs beside a bent ground electrode, and the small distance between them is the gap. A crush washer under the hex seals the seat as you tighten.
The top half hides inside the boot, the thick black rubber cap at the end of the ignition lead. That boot is the only part you should ever grab. Yank the wire itself and you’ll tear the conductor right out of the connector.
Finding It on Push Mowers vs. Riding Mowers
On most push mowers, the plug sits on the front or side of the engine block, angled slightly outward, usually away from the muffler. Trace the thickest rubber wire on the engine. It ends at the boot, and the boot plugs straight onto the plug.
Riding mowers and lawn tractors complicate things. Twin-cylinder engines carry two plugs, one per cylinder head, and many sit behind a plastic shroud or part of the dash panel. You might need to remove two or three fasteners before the plug is even visible.
Check your model’s manual before prying anything, because hidden clips vary by brand.
The Tools: Why a 13/16″ Spark Plug Socket with a Rubber Insert Is Non-Negotiable
You can pull a plug with pliers in an emergency, but don’t make a habit of it. Pliers round off the hex corners, and a rounded plug is miserable to extract. The right socket costs about eight dollars and prevents the whole headache.
| Tool | What it does |
|---|---|
| 13/16-inch (21 mm) spark plug socket with rubber insert | Fits most mower plugs and grips without cracking the ceramic |
| 5/8-inch (16 mm) plug socket | Needed on some newer Honda and OHV plugs |
| 3/8-inch ratchet plus a 3 to 6 inch extension | Reaches plugs recessed in deep wells |
| Feeler gauge, blade or wire type | Sets and verifies the electrode gap |
| Torque wrench (optional) | Hits the 180 to 220 lb-in spec |
| Brush or compressed air | Clears debris from the plug well |
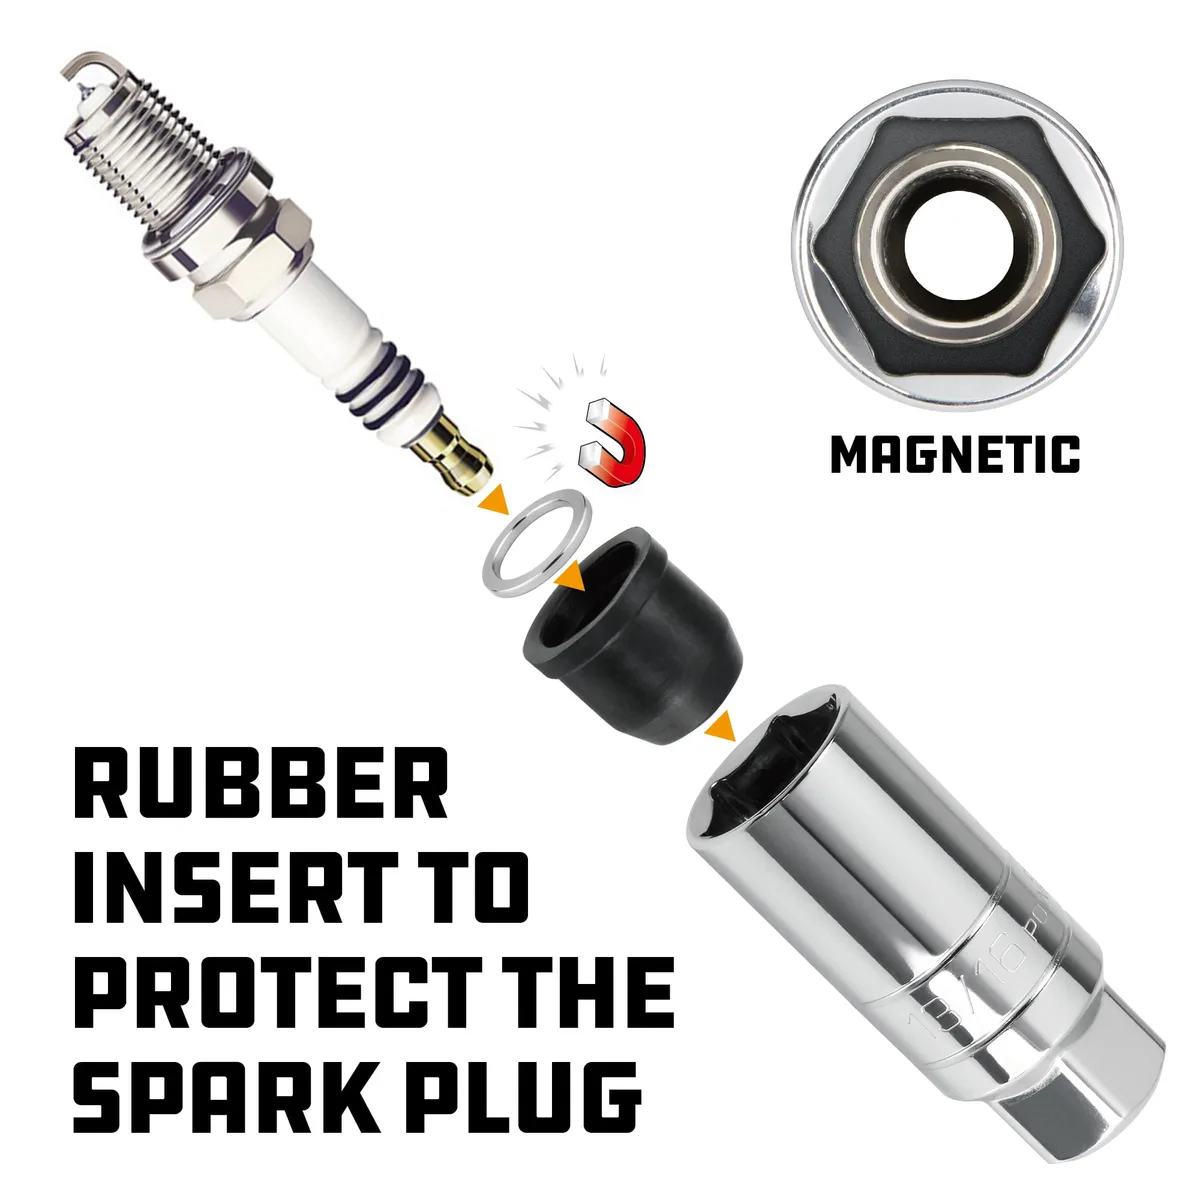
Image source: walmart.com
The rubber insert is the part people skip, and it matters. A plain deep socket can chip the ceramic insulator as you work the plug loose. A cracked insulator means a dead plug and a second trip to the store.
The insert also grips the smooth hex, so the plug can’t slip and skid sideways in the well.
Everything else is probably already in your garage. If you own a basic socket set, you’re about five dollars from finished. One last tip that repair shops repeat constantly: keep a flashlight nearby.
Plug wells sit in shadow, and you’ll want a clear view of the boot before the socket goes on.
Buying the Right Plug: Champion RJ19LM, NGK BPR5ES, and Reading Your Engine Model
The fastest way to buy wrong is to guess. Plugs differ in thread reach, seat type, and heat range, and the wrong one can contact the piston or foul black in a single season. Match the spec, not the shelf.
OEM Part Numbers and Cross-References by Engine Brand
Engine makers publish the exact plug for each engine family, and the same plug often sells under three names: the engine maker’s part number, the Champion number, and the NGK number. These pairings cover most mowers sold in the US:
| Engine brand | Common engines | Typical plug | Gap |
|---|---|---|---|
| Briggs & Stratton | 450e, 550EX, 575EX walk-behinds | Champion RJ19LM (OEM 491588S) | 0.030 inch |
| Honda | GCV160, GCV190 | NGK BPR5ES | 0.028 to 0.031 inch |
| Kohler | XT650, XT775, Command | Champion RC12YC | 0.030 inch |
| Kawasaki | FJ180V | NGK BPR5ES, per manual | about 0.030 inch |
Treat the table as a starting point, not a guarantee. Briggs alone has used several OEM numbers across its engine lines, and newer engines often call for a different plug than older ones with similar displacement. The reliable method takes two minutes.
Find the engine’s model and spec numbers, stamped on the housing or the recoil sticker, then look them up in the maker’s documentation. Briggs & Stratton’s official manual lookup handles this, and Honda publishes equivalent specs on its engine site. As of 2026, both makers still support downloadable manuals for engines going back decades.
Copper, Platinum, or Iridium: What’s Actually Worth It on a Mower
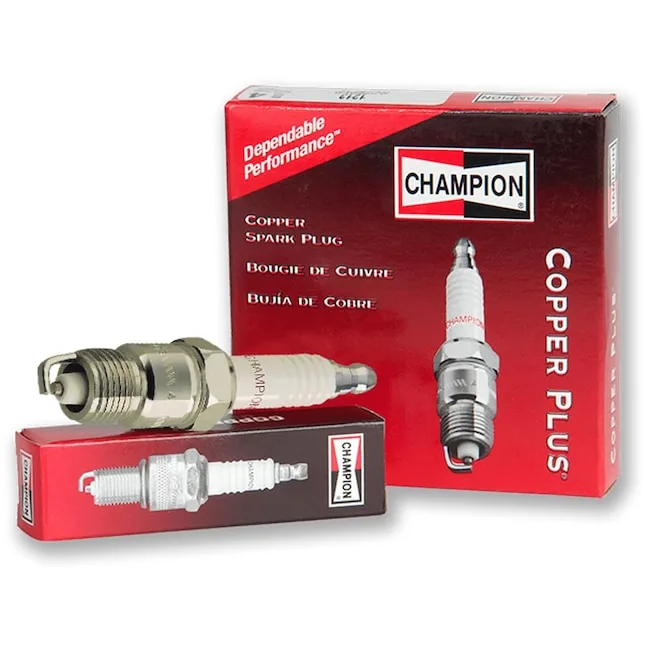
Image source: lowes.com
Walk-behind mower plugs come in three electrode flavors. Copper-core nickel plugs, like the RJ19LM, cost 3 to 6 dollars and are designed to be replaced yearly. Platinum and iridium plugs last longer and run 8 to 15 dollars.
Here’s the honest take. A residential mower runs maybe 20 to 40 hours a season. A copper plug swapped every spring never gets the chance to wear out, so the premium metals buy you almost nothing.
Buy what your manual specifies and spend the savings on fuel stabilizer. The one exception: if the manual lists a platinum OEM number, follow it, because that gap holds steadier across the season.
How to Change a Lawn Mower Spark Plug, Step by Step (With Visual Checkpoints)
Everything above leads here. The six steps below run 10 to 15 minutes on a push mower. Do them in order, because each checkpoint protects the next one.
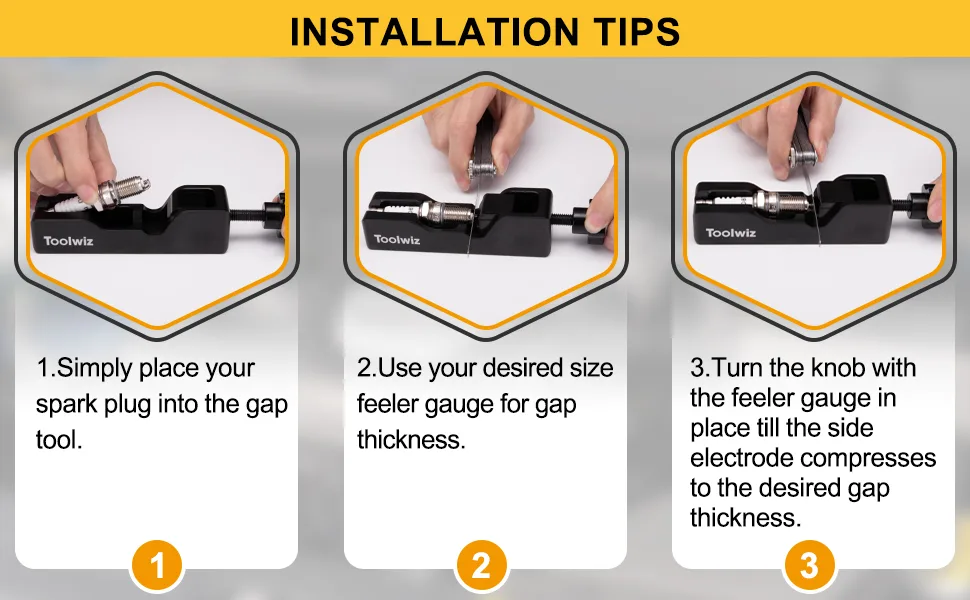
Image source: amazon.ca
Step 1: Safety First (Cold Engine, Boot Disconnected)
Wait for the engine to cool completely. Hot aluminum heads strip threads easily, and the exhaust parts beside the plug can burn you. Shut the engine down properly before touching anything so it can’t kick over mid-job.
Then grip the boot, twist it a quarter turn, and pull it straight off the plug. Tuck the boot away from the well so it can’t snap back on.
Step 2: Clean the Plug Well So Nothing Falls Into the Cylinder
Brush or blow every clipping and speck of grit out of the recess around the plug. Whatever sits there while you unscrew it can drop straight into the open cylinder. Compressed air is ideal.
No compressor? A clean paintbrush and a rag handle most wells.
Step 3: Breaking the Old Plug Loose with Socket and Extension
Fit the socket over the plug until the rubber insert grips the hex. Add the extension and ratchet, then turn counterclockwise with steady pressure. The first turn may take real force, since carbon locks the threads.
Once it cracks free, it should spin out by hand. Lay the old plug boot-end-up on a rag so you can read its deposits later.
Step 4: Gap the New Plug with a Feeler Gauge (Don’t Trust the Box)
New plugs ship near spec, but shelf handling bends electrodes. Slide the 0.030-inch blade between the center and ground electrodes. It should drag with slight resistance.
Too tight? Bend the ground electrode gently outward. Too loose?
Carefully press it closed. Honda’s engine documentation specifies 0.028 to 0.031 inch for the popular GCV160, so verify your engine’s exact number instead of assuming.
Step 5: Threading In by Hand, Then the “Hand-Tight Plus Quarter Turn” Rule
Start the plug with fingers only. It should spin smoothly for several turns. Any grinding means cross-threading, so back it out and retry.
Once finger-tight, finish with the socket. A new plug with a fresh crush washer takes a quarter turn past hand-tight, and a reused plug takes one-eighth. With a torque wrench, manufacturer specs land near 180 to 220 lb-in for a 14 mm plug.
Over-tightening is the fastest way to strip an aluminum head.
Step 6: Seating the Boot and the Test Start
Push the boot down until you feel it click onto the ceramic tip, then give it a light tug to confirm it’s locked. Pull the rope. A healthy engine fires within one to three pulls and idles smooth.
If it still won’t start, don’t buy another plug. Work through old fuel and a clogged intake before blaming the ignition coil.
What Your Old Plug Is Telling You: Reading Soot, Oil Fouling, and a Healthy Tan Electrode
The old plug is a free engine diagnostic. The ceramic tip records every condition the cylinder has run through. Lay it on a rag in good light and match what you see to the readings below.
| What you see | What it means | What to do next |
|---|---|---|
| Light tan, gray, or brown, dry | Healthy combustion, plug simply wore out | Install the new plug and move on |
| Dry black soot | Carbon fouling: rich mixture, clogged air filter, or stuck choke | Replace the plug, then check the filter and carb |
| Wet, oily black | Oil entering the cylinder from an overfill, tip-over, or worn rings | Fix the oil problem first or the new plug fouls within hours |
| White, blistered, or glossy ceramic | Engine running hot or lean | Verify the heat range and look for air leaks |
| Bent or melted electrode | Severe overheating or pre-ignition | Stop and diagnose, don’t just re-plug and run |
A clean tan reading on a mower that still runs rough is good news and bad news. Good, because nothing is fouling. Bad, because the plug wasn’t the culprit, and your search moves to fuel or ignition.
Wet oil deposits deserve their own warning. Aggregate repair-shop feedback points to two common causes: an overfilled crankcase and a mower that tipped sideways during cleaning. Either way, oil slips past the rings and coats the electrode.
Blue or gray exhaust smoke usually shows up alongside it. If you’re seeing smoke after an oil overfill, dig into what that smoke means before running the engine again.
Dry black soot points at the fuel mixture. Stale gas, a plugged air filter, or a choke stuck half closed will all do it. If the filter looks gray and dusty while the plug looks sooty, you’ve found a matching pair worth replacing together.
One last check before the old plug hits the trash. Slide a feeler gauge across its gap. A plug that left the box at 0.030 inch and now measures 0.040 or more has confirmed its own retirement.
The Mistakes That Turn a $5 Job into a $150 Repair (Cross-Threading, Wrong Reach, Yanking the Wire)
Most swaps go smoothly. The ones that don’t almost always trip on the same handful of errors. Here they are, ranked by the damage they cause.
- Cross-threading the aluminum head. Start the plug with fingers only and let it spin freely for four or five turns. Any grinding means back it out and retry. Forcing it strips the threads, and a shop repair runs 100 to 150 dollars.
- Overtightening. The crush washer compresses fully a quarter turn past hand-tight. A cheater bar adds nothing except a stripped seat.
- Yanking the lead by the wire. The conductor tears loose inside the insulation. Grip the boot only, twist a quarter turn, then pull.
- Installing the wrong plug. Too much reach and the plug can strike the piston on first crank. Too little reach leaves exposed threads collecting carbon.
- Trusting the box on the gap. Shipping and shelf handling bend electrodes. Verify 0.030 inch yourself with a feeler gauge.
- Working on a hot engine. Hot aluminum galls and strips. Wait a full hour after shutoff.
- Skipping the debris sweep. Grit sitting in the well drops straight into the open cylinder.
- Rounding the hex with pliers. Once the corners round off, removal gets ugly fast.
Thread direction trips up a surprising number of people. Spark plugs unthread counterclockwise like any normal fastener, which is the opposite of what you may have heard about reverse-threaded mower blades. Blades follow their own rules.
Plugs don’t.
Before you button everything up, push the boot down until it clicks and give it a light tug. A loose boot reads exactly like a bad new plug, and it’s the most common miss we see in beginner repair writeups.
Still Won’t Start After the Swap? When It’s Stale Gas, the Carburetor, or the Ignition Coil Instead
Don’t buy a second plug yet. Let the old plug’s condition steer the diagnosis, then work the if/then path below.
- If the old plug was wet with raw fuel, the engine is flooding or getting no spark. Test for spark with an inline tester, a 5 to 10 dollar tool that connects between the boot and the plug. It’s far safer than holding a plug against the block while someone pulls the rope.
- If the old plug was dry and tan, suspect fuel delivery first. Untreated gasoline starts degrading in about 30 days, and ethanol blends pull in moisture. Drain the carburetor bowl, fill with fresh gas, and add stabilizer.
- If the gas is fresh and it still won’t fire, varnish has likely clogged the carburetor jets. A spray of carb cleaner into the bowl and jets fixes many cases. Stubborn ones need a rebuild kit.
- If the air filter is gray, dusty, or oily, replace it. Restricted airflow floods the engine and mimics a dead plug.
- If the spark tester shows nothing with the new plug installed, the ignition coil armature has failed. Its air gap to the flywheel typically runs 0.010 inch, set with a feeler gauge.
- If the engine cranks then dies within seconds, check the oil level first. Many engines carry a low-oil shutoff that kills the ignition. Top up to the correct oil fill before touching anything else.
Once it runs again, finish the job right. Fresh oil, a clean filter, and a sharp blade belong in the same spring session. Knock out the rest of the tune-up while the hood is already open, and you’ve covered the season’s entire maintenance list in one morning.
Spark Plug Gap, Torque Specs, and Replacement Intervals by Engine (Quick Reference Table)
Bookmark this one. Plug specs follow the engine family, not the mower brand, and the numbers shift slightly between makers.
| Engine family | Common plug | Gap | Replace every | Tightening rule |
|---|---|---|---|---|
| Briggs & Stratton 450e, 550EX, 575EX | Champion RJ19LM (OEM 491588S) | 0.030 in | 25 to 50 hours or yearly | Hand-tight plus 1/4 turn, or 180 to 220 lb-in |
| Honda GCV160, GCV190 | NGK BPR5ES | 0.028 to 0.031 in | Yearly for residential use | Hand-tight plus 1/4 turn |
| Kohler XT650, XT775, Command | Champion RC12YC | 0.030 in | Every 100 hours or yearly | Hand-tight plus 1/4 turn |
| Kawasaki FJ180V | NGK BPR5ES | About 0.030 in | Every 100 hours or yearly | Hand-tight plus 1/4 turn |
| 2-cycle walk-behind engines | Champion RCJ6Y or per manual | 0.030 in | Yearly, fouls faster | Hand-tight plus 1/4 turn |
Where the manual gives an exact torque figure, use it. The quarter-turn fallback lands in spec nearly every time when a torque wrench isn’t handy. For the newest numbers, Honda publishes current spec sheets for each engine family on its official engine site, and the other makers maintain similar lookup tools.
Verify before you wrench.
Riding tractors with twin-cylinder engines take two plugs, one per head, on the same interval. Most brands publish full maintenance charts alongside their tune-up parts, and following brand-specific service schedules protects warranty coverage on newer machines. Husqvarna’s setup, for example, folds the plug swap into a documented annual service routine.
One caution on 2-cycle engines. Oil-rich fuel mixtures foul electrodes faster, so inspect the plug mid-season even when the calendar says you’re fine.
Lawn Mower Spark Plug FAQs
How often should you change a lawn mower spark plug?
Every 25 to 50 operating hours, or once each mowing season, whichever comes first. That timing matches the maintenance schedules most engine makers publish. Swap it sooner if you notice hard starts, surging, or misfiring.
At 3 to 12 dollars, a plug is cheap insurance against a mid-season breakdown.
Can you clean a spark plug instead of replacing it?
Sometimes. Light carbon dust on an otherwise sound plug can be brushed off with a wire brush and a shot of carb cleaner. Cracks, heavy oil glaze, or burned electrodes mean replace it.
At these prices, cleaning rarely pays. Never reinstall a plug with a chipped ceramic insulator.
What happens if the spark plug gap is wrong?
Too wide, and the coil can’t push the spark across, so the engine misfires and starts hard. Too narrow, and the spark stays weak, which invites fouling. Even 0.005 inch off spec hurts performance.
Check every new plug with a feeler gauge before it goes in.
Do all lawn mowers use the same spark plug?
No. The plug follows the engine, not the mower brand, and engines vary by family and spec number. A Toro with a Briggs engine wants a different plug than a Toro with a Honda.
Find your engine’s model number, then match the OEM part number or its cross-reference.
Can you change a lawn mower spark plug with the engine hot?
Wait for a cold engine, always. The cylinder head is aluminum, and hot aluminum threads strip or gall far more easily. Hot exhaust parts beside the plug cause real burns too.
Give the engine at least an hour to cool, then start the job.
Why won’t my mower start even with a new spark plug?
Then the plug wasn’t the problem. Work the likely suspects in order: stale fuel, a clogged carburetor jet, a plugged air filter, or a failed ignition coil. On riding mowers, confirm the charge in the 12-volt starting batteries most models use, and check the safety switches.
Dry, tan deposits on the old plug point straight at fuel delivery.